3D piece, process and final piece
Basing myself on the sketches I created, I drew the design on fabric
to drape it on the mannequin:

After this, I transferred the shape of the piece of fabric onto the black vinyl I bought to use as the main material of the design.

This is where I encountered the first issue; as I feared while creating the prototype, the vinyl is too stiff to mould correctly to the mannequin, and it created creases and weird shapes. Therefore, I had to look for another material to use for my dress. After thinking about options for a while I reached the conclusion of using sealing foam.

To use this material I made sure I was following the adequate safety measures;
-I used a Respirator N95 mask
- I made sure to work only in ventilated areas
- I covered with plastic bags the surfaces I was going to pour the foam on
- I did not leave it unattended or near food
-I wore gloves during the whole process
I poured the foam in the approximate shapes I wanted to carve, knowing that it would expand through the drying process. I used a craft knife to carve the pieces.

The dry foam piece before carving it

Using the draped piece of fabric as a guide

The final top left carved piece
After carving every piece I glued them together with super glue. As well, I took the waste of the foam to fill in the holes in the carved pieces to have a smoother surface. I painted every piece twice, firstly with a black layer and later on I mixed metallic silver paint with black paint.
I left this to dry and once it was not wet anymore I cut the metallic fabric to glue it. Fitting it in place, I used sewing pins to hold the fabric and PVA glue with a brush to glue the edges of the fabric.

The back of the main piece with a pin holding the fabric in place, about to be glued

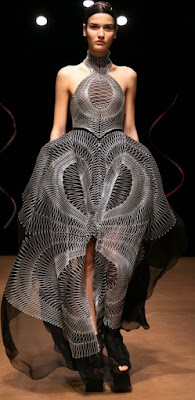
Once again I wanted for it to fully dry, and then took out the pins. Putting it around the mannequin, I glued the front part of the dress to the back, finishing the project.

The final result

Comments
Post a Comment